Share your love
Install Ubuntu 25.04 on VMware Workstation

Installing Ubuntu 25.04 on VMware allows you to explore the latest features and enhance your experience. It lets you test and play with the new OS without affecting your main system. In this guide from the Orcacore website, you will learn how to install Ubuntu 25.04 on VMware Workstation from downloading the ISO file to completing the OS setup. This is perfect for beginners and advanced users alike.
You can check for Ubuntu 25.04 Plucky Puffin Features to get more details about this version.
Table of Contents
Requirements To Install Ubuntu 25.04 on VMware Workstation
Before you start the setup, you need to be sure you have the following requirements:
- A PC with VMware Workstation installed.
- The official Ubuntu 25.04 ISO file.
- At least 20GB of free disk space and 4GB or more of RAM.
Then, proceed to the steps below to start your Ubuntu 25.04 installation on VMware.
1. Download Ubuntu 25.04 ISO File
First of all, you need to visit the official Ubuntu downloads page and select Ubuntu 25.04 “Plucky Puffin” (Stable or Development, depending on availability).
Note: If you’re new to Ubuntu or running it in VMware just to try things out, go with Ubuntu Desktop. You can always install server software on it later.
Finally, download the ISO file (around 4GB). It contains everything needed to install Ubuntu 25.04 in a virtual machine.
2. Open VMware and Create a New Virtual Machine
After you have downloaded the ISO file, open VMware Workstation and click “Create a New Virtual Machine”.

Then, choose the Typical (recommended) option and click Next.

3. Attach Ubuntu 25.04 ISO File To Virtual Machine
Now, under the “Installer disc image file (iso)”, click Browse and select the Ubuntu 25.04 ISO you downloaded, and then click Next.

4. Configure the Operating System in the Virtual Machine
After attaching the ISO file, if VMware can not detect your OS, you will see this window for choosing an OS. Select your guest operating system and version in this window and click Next.
- Guest OS: Linux
- Version: Ubuntu 64-bit
5. Name your Virtual Machine and Specify the Location
At this point, you need to give a name like “Ubuntu 25.04 Plucky Puffin” to your virtual machine, set a password, and choose a location on your system to save the VM files. Click Next.


6. Allocate Disk Space for Ubuntu 25.04 Virtual Machine
Now you must set aside at least 20 GB of virtual hard drive space and choose “Store virtual disk as a single file” for better performance. Click Next to continue.

7. Customize Hardware Settings for Virtual Machine
Before you finish your setup, you can configure your hardware settings. To do this, click “Customize Hardware…”.

Then, you can set the following values for your settings:
- Memory: 4096 MB (4GB) or more
- Processors: 2 cores minimum
- Network Adapter: NAT (default) or Bridged
- Display: Enable 3D acceleration for better graphics

Once you are done, click Close.
8. Start Ubuntu 25.04 Virtual Machine
Now you can select your newly created VM and click “Power on this virtual machine”. The Ubuntu 25.04 installer will boot automatically.

9. Install Ubuntu 25.04 Pucky Puffin Inside VMware
At this point, you can follow these simple steps in the Ubuntu 25.04 installer:
First, choose your desired Language.

You can also customize Accessibility in Ubuntu. Or simply press Next. You can change it anytime you want.

Then, choose your preferred layout.

You need to configure your internet settings. Here we use a wired connection.

Next, select Install Ubuntu.

To get a step-by-step installation, select Interactive Installation.

Here you can choose which apps you want to install. You can proceed with the Default Selection and install your desired apps later.

Now you can Install Third-party software for graphics and Wi-Fi hardware.

For installation type, choose “Erase disk and install Ubuntu” (this only applies to the virtual disk).

At this point, you can set a passphrase or choose No Encryption.

Now, create a user account. Set your name, computer name, username, and password.

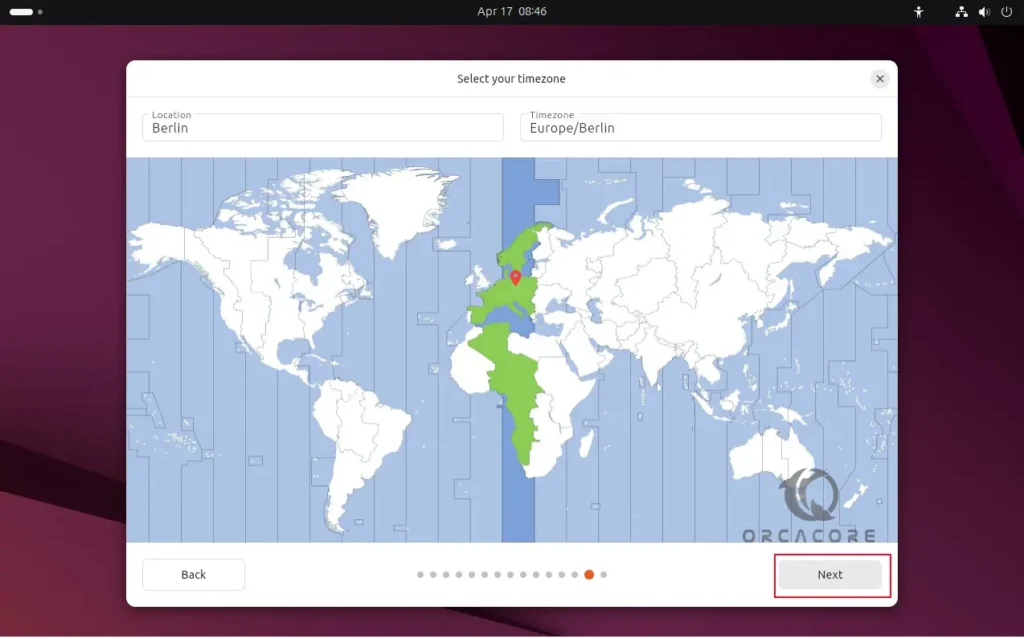
Select a timezone, and pick your location.
Finally, click Install to begin the installation. Let the installation process finish (around 10–15 minutes).

When prompted, click “Restart Now”.

Choose your account you have created, and enter your password to log in to your Ubuntu 25.04.

Now you have Ubuntu 25.04 Desktop ready to use.

Also, you can check the Initial Settings After Installing Ubuntu 25.04.
10. Optional: Install VMware Tools for Better Performance
VMware Tools is a suite of utilities that greatly improve the integration between your Ubuntu virtual machine and your host system. Once installed, you’ll have access to helpful features like:
✅ Seamless mouse movement between host and VM
✅ Copy-paste between host and guest
✅ Drag-and-drop files
✅ Automatic screen resizing
✅ Improved graphics performance and system responsiveness
If you notice things like jerky mouse movement, inability to resize the window dynamically, or no clipboard sharing, you need VMware Tools.
To install VMware tools, follow the steps below:
Start your Ubuntu 25.04 virtual machine and from the VMware menu bar, go to:
Player > Manage > Install VMware ToolsNote: If it’s already mounted, it may say “Reinstall VMware Tools“. You can reinstall it.
VMware will now insert a virtual CD drive into your Ubuntu system containing the VMware Tools installer.
In Ubuntu, you’ll see a CD icon appear on your desktop or in the File Manager sidebar. Click on it. You should see a file named something like:
VMwareTools-<version>.tar.gzRight-click the .tar.gz file and choose Extract Here. This will create a new folder, usually called:
vmware-tools-distribOpen a Terminal window in that folder. Right-click the folder → “Open in Terminal”. Or you can use:
cd ~/Downloads/vmware-tools-distribBefore running the installer, install these packages to ensure a smooth installation:
# sudo apt update
# sudo apt install build-essential linux-headers-$(uname -r)
In the Terminal (inside the extracted folder), run the command below:
sudo ./vmware-install.plThis is a Perl script that installs VMware Tools. You’ll be prompted with several questions. For most of them, just press Enter to accept the defaults.
Once installation is complete, reboot the VM to activate all features:
sudo rebootAfter rebooting, you should notice:
- The screen resizes automatically when you resize the VM window.
- Mouse and keyboard input are smoother and more responsive.
- You can copy and paste text between your host machine and the Ubuntu VM.
- You can drag and drop files (if supported by your VMware version).
Troubleshooting Tips
- If the VMware Tools CD doesn’t appear, make sure you’re using the latest version of VMware and that the VM is using the correct guest OS type (Ubuntu 64-bit).
- Some features (like drag-and-drop) may work only in VMware Workstation Pro, not Player.
- If you update your Ubuntu kernel in the future, you may need to reinstall VMware Tools.
Conclusion
Congratulations! You’ve successfully installed Ubuntu 25.04 Plucky Puffin on VMware. Now you can explore Ubuntu’s latest features, install applications using the Ubuntu Software Center or Terminal, develop software, test Linux tools, and much more.
Using a virtual machine allows you to safely explore and test Ubuntu without affecting your main OS. Whether you’re a developer or just curious, Ubuntu 25.04 is a fun and functional system to try.
Hope you enjoy it. Please subscribe to us on Facebook, X, and YouTube.
You may also like to read the following articles:
Top 5 Free Alternatives To VMware Workstation