Share your love
NFS Server and Client Configuration on Ubuntu 22.04 – Best Setup
In this guide, you will learn NFS Server and Client Configuration on Ubuntu 22.04. A NFS (Network File System) Server is a networked file-sharing solution that allows multiple remote computers to access files and directories over a network as if they were locally mounted. It is commonly used in networked environments where centralized file storage and sharing are required, such as in enterprise networks, academic institutions, and cloud computing environments.
Now you can follow the rest of the article on the Orcacore website to install the NFS server on Ubuntu 22.04 and configure your NFS client.
Table of Contents
A Comprehensive Guide To NFS Server and Client Configuration on Ubuntu 22.04
To set up the NFS server on Ubuntu 22.04, you must access your server as a non-root user with sudo privileges and set up a basic firewall. To do this, you can check the Ubuntu 22.04 Initial Setup Guide.
Also, you need a client machine. In this guide, we use an Ubuntu machine.
Now follow the steps below to complete NFS Server and Client Configuration on Ubuntu 22.04.
Step 1 – Install NFS Server on Ubuntu 22.04
First, you must run the system update with the following command:
sudo apt updateThen, use the following command to install the NFS server package on Ubuntu 22.04:
sudo apt install nfs-kernel-server -yOnce your installation is completed, your NFS server must be enabled and activated. To verify it, you can run the command below:
sudo systemctl status nfs-serverIn your output, you will see:

Step 2 – Where are NFS Server Config Files on Ubuntu 22.04?
On Ubuntu 22.04, the main NFS configuration file is located in the file “/etc/nfs.conf“. It allows you to set up and configure the NFS server.
Another configuration for the NFS service is located at “/etc/default/nfs-*“, this can be used to set up the NFS service on how the service will be running.
Also, the default NFS versions enabled on the default installation are the NFSv3 and NFSv4. To check this, you can run the command below:
cat /proc/fs/nfsd/versionsExample Output
-2 +3 +4 +4.1 +4.2Step 3 – Set up the NFS Server Shared Directories
At this point of NFS Server and Client Configuration on Ubuntu 22.04, you need to set up the shared directory for NFS clients. To do this, you need to create two directories /mnt/shared and /mnt/backup by using the following command:
sudo mkdir -p /mnt/shared /mnt/backupThen, set the correct permissions and ownership for these directories by using the commands below:
# sudo chown -R nobody:nogroup /mnt/shared /mnt/backup
# sudo chmod 775 /mnt/shared /mnt/backup
Next, use your favorite text editor like Vi Editor and Nano Editor to create a new configuration file:
sudo vi /etc/exportsAdd the following content to the file:
/mnt/backup  192.168.10.21(rw,sync,no_subtree_check)
/home 192.168.10.21(rw,sync,no_root_squash,no_subtree_check)
/mnt/shared 192.168.10.0/24(rw,sync,no_subtree_check)
Here we set up three shared directories /mnt/backup and /home for the client 192.168.10.21, and /mnt/shared for the entire network in 192.168.10.0/24.
When you are done, save and close the file.
Then, restart the NFS server to apply the changes on Ubuntu 22.04:
sudo systemctl restart nfs-server
Also, you can check the list of shared directories on the NFS server by using the command below:
sudo exportfs -vIn your output, you will see:

Step 4 – Set Firewall Rules For NFS Server
At this point of NFS Server and Client Configuration on Ubuntu 22.04, you need to specify the client IP address or network in the UFW firewall rule that will be allowed to access the NFS service port. To do this, you can use the following commands:
sudo ufw allow from 192.168.10.21 to any port nfs
sudo ufw allow from 192.168.10.0/24 to any port nfs
Remember to replace the IP addresses with your values.
Then, reload the firewall to apply the new rules:
sudo ufw reloadAlso, you can check your UFW rules on Ubuntu 22.04:
sudo ufw status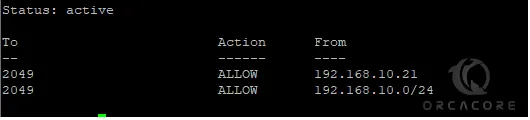
Step 5 – NFS Client Configuration
As we said on NFS Server and Client Configuration on Ubuntu 22.04, we use an Ubuntu server as the client machine. So you need to run the system update and install the NFS client package by using the commands below:
# sudo apt update
# sudo apt install nfs-common -y
Then, run the following command to check available shared directories on the NFS server, here our NFS server is 192.168.10.15:
sudo showmount -e 192.168.10.15In your output, you should see three different shared directories available on your NFS server, /mnt/backup, /mnt/shared, and /home.
Next, you need to create new directories /data, /backup, and /shared. These will be used to mount NFS-shared directories. To do this, run the following command:
sudo mkdir -p /data /backup /sharedThen, mount the NFS-shared directories by using the command below:
# sudo mount 192.168.10.15:/mnt/backup /backup
# sudo mount 192.168.10.15:/mnt/shared /shared
# sudo mount 192.168.10.15:/home /data
Finally, you can verify your NFS-shared directories with the command below:
sudo df -hStep 6 – From NFS Client Verify Write Access To NFS Server
At this point of NFS Server and Client Configuration on Ubuntu 22.04, you need to be sure to read and write access to the shared directories.
From your NFS client machine, create new files /backup/test-write1.txt, /shared/test-write2.txt, and /home/alice/test-write3.txt by using the commands below:
# echo "This file from client" > /backup/test-write1.txt
# echo "This file from client" > /shared/test-write2.txt
# echo "This file from client" > /data/alice/test-write3.txt
Then, from your NFS server, be sure that these files are available:
# cat /mnt/backup/test-write1.txt
# cat /mnt/shared/test-write2.txt
# cat /home/alice/test-write3.txt
You should see the text This file from the client in your output.
Step 7 – Auto Mount NFS Server From Client
At this point of NFS Server and Client Configuration on Ubuntu 22.04, you can set up auto-mount of the NFS server on the client machine. So, whenever the client machine is restarted, the NFS shared directory will be mounted automatically during the boot. You can do this by using the /etc/fstab file.
First, you need to umount and verify NFS shared directories on the client machine by using the following commands:
# sudo umount /data /backup /shared
# sudo df -h
Then, open the /etc/fstab file with your favorite text editor, here we use vi:
sudo vi /etc/fstabAdd the following content to the file:
192.168.10.15:/mnt/backup /backup nfs auto,nofail,noatime,nolock,intr,tcp,actimeo=1800 0 0
192.168.10.15:/mnt/shared /shared nfs auto,nofail,noatime,nolock,intr,tcp,actimeo=1800 0 0
192.168.10.15:/home /data nfs auto,nofail,noatime,nolock,intr,tcp,actimeo=1800 0 0Note: Be sure to customize the details of shared directories and target mount directories.
When you are done, save and close the file.
Verify your /etc/fstab file configuration with the command below:
sudo mount -aFinally, you can get your client’s mounted file systems list with the command below:
sudo df -hConclusion
In conclusion, NFS Server and Client Configuration on Ubuntu 22.04 enables the sharing of files and directories across a network, enhancing collaboration and resource accessibility. By following the steps, users can set up an NFS server to share directories from a host system and configure client machines to mount and access those shared directories.
Hope you enjoy it. Also, you may like to read the following articles:
Set Up the NFS Server and Client on AlmaLinux 9