Share your love
Set up Samba Share on AlmaLinux 9: Best File Sharing

In this tutorial, we want to teach you to Set up Samba Share on AlmaLinux 9. Samba is a potent tool that allows you to create seamless file and printer sharing to SMB/CIFS clients from a Linux server/desktop. With Samba you can even connect that Linux machine to a Windows Domain.
Now follow the steps below on the Orcacore website to install Samba on your Linux server and set up the Samba clients on both Linux and Windows.
Table of Contents
Steps To Set up Samba Share on AlmaLinux 9
To complete this guide, you must log in to your server as a non-root user with sudo privileges. To do this, you can follow our guide on Initial Server Setup with AlmaLinux 9.
1. Install Samba on AlmaLinux 9
Samba packages are available in the default AlmaLinux repository. First, update your local package index with the command below:
sudo dnf update -yThen, use the following command to install Samba:
sudo dnf install samba samba-common samba-client This will install the dependencies and required packages.
Then, use the commands below to start and enable the Samba service on Almalinux 9:
# sudo systemctl start smb.service
# sudo systemctl enable smb.service
Verify your Samba service is active and running:
sudo systemctl status smb.service
2. Configure Samba on AlmaLinux 9
You need to make some changes to the Samba config file and create share samba directories. To do these, follow the steps below.
Set Samba Global Settings
At this point, you need to open the Samba configuration file with your favorite text editor, here we use vi editor:
sudo vi /etc/samba/smb.confUnder the Global section, find the line below and make sure it is like this:
workgroup = WORKGROUPWhen you are done, save and close the file.
Create Samba Share Directories on AlmaLinux 9
At this point, you can share both public and private directories. So you can create the two directories by using the following commands:
# sudo mkdir /public
# sudo mkdir /private
Now you need to open the Samba config file again and add the shares and authentication methods to the end of the file.
sudo vi /etc/samba/smb.conf[public]
comment = Public Folder
path = /public
writable = yes
guest ok = yes
guest only = yes
force create mode = 775
force directory mode = 775
[private]
comment = Private Folder
path = /private
writable = yes
guest ok = no
valid users = @smbshare
force create mode = 770
force directory mode = 770
inherit permissions = yesWhen you are done, save and close the file.
Create a Samba Share User Group
At this point, you need the Samba share user group to access the Private share as specified in the config file above.
Create the group by using the command below:
sudo groupadd smbshareSet the correct permissions for the private share by using the commands below:
# sudo chgrp -R smbshare /private/
# sudo chgrp -R smbshare /public
Next, set the correct permissions for the directories:
# sudo chmod 2770 /private/
# sudo chmod 2775 /publicNote: The value 2 at the beginning of the above commands, stands for the SGID bit. This allows newly created files to inherit the parent group.
Create a no-login Local User
Now you should create a no-login local user to access the private share by using the command below:
sudo useradd -M -s /sbin/nologin sambauserThen, add the user to the Samba share group on AlmaLinux 9 with the following command:
sudo usermod -aG smbshare sambauserFinally, set a password for your Samba user:
sudo smbpasswd -a sambauserOutput
New SMB password:
Retype new SMB password:
Added user sambauser.Enable the created account by using the following command:
sudo smbpasswd -e sambauserOutput
Enabled user sambauser.Verify Samba Configuration
When you are done with the above steps, you can test your Samba configuration on AlmaLinux 9 that is working correctly or not with the following command:
sudo testparm
This means that everything is configured appropriately.
Create Demo Files in Samba Share
At this point, you can create demo files in the Samba shares. To do this. you can run the following commands:
# sudo mkdir /private/demo-private /public/demo-public
# sudo touch /private/demo1.txt /public/demo2.txt
To apply the changes, restart the Samba service on AlmaLinux 9:
sudo systemctl restart nmbAccess Share Files From Local Machine
Before you set up Samba clients, you can try accessing your shared files with the command below on AlmaLinux 9:
smbclient '\\localhost\private' -U sambauser
3. Samba Share For Windows Client
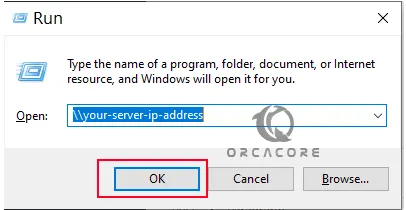
At this point, we want to show you access to the share from Windows. First, open a run box using Win+R and enter your AlmaLinux 9 IP address in the box and click Ok:
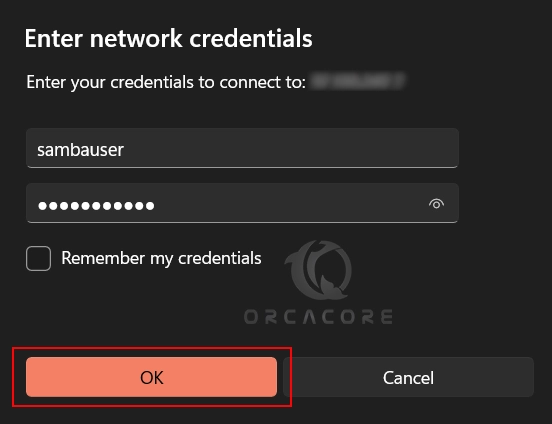
You will see the following screen, you should enter your Samba user credentials and click Ok.
Then, the Samba shared folders on AlmaLinux 9 should appear as below:

You can open one of the files, and create a new file there. You should see the file on your server machine too.
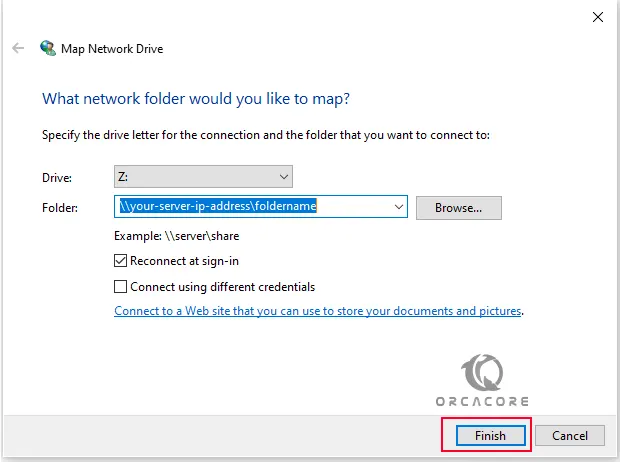
Mount Network Drive
At this point, you can mount the Samba share permanently on your Windows system. Right-Click on This PC->Map Network Drive. This will open a window for you, provide the Path details and click Finish.
Then, enter the Samba user credentials and click ok.
You will have the share available on your This PC.
4. Samba Share For Linux Client
At this point, you can access the share folders from a Linux client. To do this, you need to have Samba packages installed on your server. Here our Linux client is AlmaLinux:
sudo dnf install samba samba-common samba-client Then, navigate to File manager->Other locations and add your share using the syntax below.
smb://server-name/Share_nameEnter the credentials for the samba user. That is it! You have your Samba share on your Linux client machine.
Conclusion
At this point, you have learned to Set up or Install and Configure Samba Share on AlmaLinux 9. And also, you have learned to set up Samba clients on both Windows and Linux machines.
Hope you enjoy it. You may also like these articles:
Reset Root Password on AlmaLinux 9
How To Install Gradle on AlmaLinux 9
Count Files in a Linux Directory with Examples
Work With FFmpeg on Linux with Examples
Install Heimdall Application Dashboard on Linux
Network Bridge Config on Debian 12