Share your love
Best Steps To Install and Configure Nagios on Centos 7
In this guide, we want to teach you How To Install and Configure Nagios on Centos 7. Nagios is an open-source tool that is widely used to monitor the systems, infrastructure, and networks so that performance bottlenecks can be identified. The tool offers several services like monitoring of servers, applications, and switches and also sends alerts to the user when any performance issue is identified in the system. The tool is also capable of sending alerts when the issue is identified.
You can now follow the steps below provided by the Orcacore team to Install and Configure Nagios on Centos 7.
Table of Contents
Easy Steps To Install and Configure Nagios on Centos 7
To Install and Configure Nagios on Centos 7, you must log in to your server as a non-root user with sudo privileges. To do this, you can follow this guide on Initial Server Setup with Centos 7.
Also, you need to set up a basic firewall with firewalld. You can follow our guide on Setting up a Firewall with firewalld on Centos 7.
Then, you must disable SELinux. You can visit How To Disable SELinux on Centos.
Finally, you must have Apache and PHP installed on your server. To do this, you can follow our installation part of these guides:
Now follow the steps below to Install and Configure Nagios on Centos 7.
Install Nagios Monitoring Tool on Centos 7
First, you need to install the required packages and dependencies with the following command:
sudo yum install php-cli gcc glibc glibc-common gd gd-devel net-snmp openssl-devel wget make gettext autoconf net-snmp-utils perl-Net-SNMP postfix unzip automake -yThen, navigate to the /usr/src directory:
cd /usr/src/Visit the Project GitHub repository and download the latest release of the Nagios tar.gz file:
sudo wget https://github.com/NagiosEnterprises/nagioscore/releases/download/nagios-4.4.7/nagios-4.4.7.tar.gzWhen your download is completed, extract your file with the following command:
sudo tar zxf nagios-*.tar.gzNext, switch to your Nagios directory on Centos 7:
cd nagios-4.4.7Now run the following script which will perform several checks to make sure all of the dependencies on your system are present:
sudo ./configureThen, start your compilation process with the following command:
sudo make allThe compilation may take some time, depending on your system. Once the build process is completed, you will get the following output:
Output
For more information on obtaining support for Nagios, visit:
*************************************************************
Enjoy.
At this point, you need to create a new Nagios user and group on Centos 7:
sudo make install-groups-usersOutput
groupadd -r nagios
useradd -g nagios nagiosThen, add the Apache user to the Nagios group:
sudo usermod -a -G nagios apacheNow run the following command to install Nagios binary files, CGIs, and HTML files:
sudo make installOutput
...
*** Main program, CGIs and HTML files installed ***
...Nagios can process commands from external applications. Create the external command directory and set the proper permissions by running the following command:
sudo make install-commandmodeOutput
*** External command directory configured ***Install the sample Nagios configuration files:
sudo make install-configOutput
*** Config files installed ***
Remember, these are *SAMPLE* config files. You'll need to read
the documentation for more information on how to actually define
services, hosts, etc. to fit your particular needs.Run the command below to install the Apache web server configuration files:
sudo make install-webconfOutput
*** Nagios/Apache conf file installed ***Then, restart Apache:
sudo systemctl restart httpdHere you need to create a systemd unit file. The following command installs a systemd unit file and also configures the Nagios service to start on boot:
sudo make install-daemoninitOutput
*** Init script installed ***Configure NagiosAdmin User Account
To be able to access the Nagios web interface we’ll create an admin user called nagiosadmin.
Run the following htpasswd command to create a user called nagiosadmin:
sudo htpasswd -c /usr/local/nagios/etc/htpasswd.users nagiosadminYou will be asked to enter a password for your user:
Output
New password:
Re-type new password:
Adding password for user nagiosadmin
To apply the changes, restart Apache:
sudo systemctl restart httpdConfigure Firewall Rules For Nagios
At this point, you need to allow traffic on HTTP and HTTPs with the following commands:
# sudo firewall-cmd --permanent --zone=public --add-service=http
# sudo firewall-cmd --permanent --zone=public --add-service=https
To apply the new rules, run the following command:
sudo firewall-cmd --reloadInstall Nagios Plugins on Centos 7
To install the Nagios plugins, switch to your /usr/src directory:
cd /usr/src/Download the latest version of the Nagios Plugins from the project Github repository:
sudo wget -O nagios-plugins.tar.gz https://github.com/nagios-plugins/nagios-plugins/releases/download/release-2.4.0/nagios-plugins-2.4.0.tar.gzWhen the download is complete extract the tar file:
sudo tar zxf nagios-plugins.tar.gzSwitch to your Nagios plugins directory:
cd nagios-plugins-2.4.0Run the following commands one by one to compile and install the Nagios plugins:
# sudo ./configure
# sudo make
# sudo make install
Now that both Nagios and its plugins are installed, start the Nagios service on Centos 7 with the following comamnd:
sudo systemctl start nagiosTo verify that Nagios is running, check the service status with the following command:
sudo systemctl status nagiosOutput
● nagios.service - Nagios Core 4.4.7
Loaded: loaded (/usr/lib/systemd/system/nagios.service; enabled; vendor preset: disabled)
Active: active (running) since Thu 2022-07-28 05:50:55 EDT; 5s ago
Docs: https://www.nagios.org/documentation
Process: 1866 ExecStart=/usr/local/nagios/bin/nagios -d /usr/local/nagios/etc/nagios.cfg (code=exited, status=0/SUCCESS)
Process: 1865 ExecStartPre=/usr/local/nagios/bin/nagios -v /usr/local/nagios/etc/nagios.cfg (code=exited, status=0/SUCCESS)
Main PID: 1868 (nagios)
...Access Nagios Web Interface
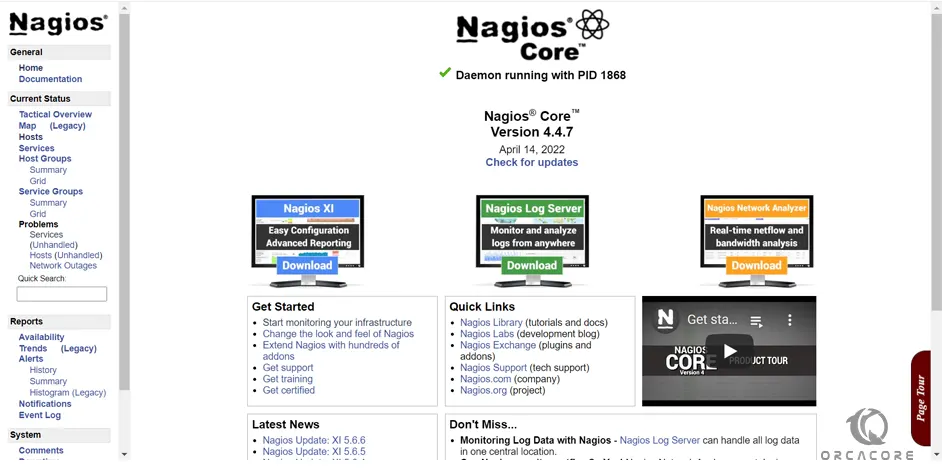
At this point , you access your Nagios Web Interface by typing your server’s IP address in your web browser followed by nagios:
http://server-ip/nagiosEnter the nagiosadmin user login credentials and click sign in:

You will be redirected to the default Nagios home page as shown in the image below:
That’s it, you are done.
Conclusion
At this point, you have learned to Install and Configure Nagios on Centos 7. Nagios Core is a great free tool that you can use for your server monitoring like apps, services, networks, etc.
Hope you enjoy using it. Also, you may like to read the follwoing articles:
Installing Monitorix Tool on Centos 7