Share your love
Best Steps Install and Configure Redis on Debian 12
In this guide, we want to teach you to Install and Configure Redis on Debian 12 Bookworm. Redis gets its name from the Remote Dictionary Server. It is an open-source fast in-memory database and cache, optimized for speed, and written in C. Also, it is a powerful tool that can be used for caching, session management, messaging, data storage, and more. Redis is popular among developers for building high-performance and scalable applications.
You can now proceed to the following steps provided by the Orcacore website to Install and Configure Redis on Debian 12.
Table of Contents
Steps To Install and Configure Redis on Debian 12
To Install and Configure Redis on Debian 12, you must log in to your server as a non-root user with sudo privileges. To do this, you can check this guide on Initial Server Setup with Debian 12.
Then, follow the steps below to Install and Configure Redis on Debian 12.
Step 1. Installing Redis from Source on Debian 12
First, you must run the system update with the command below:
sudo apt updateThen, you must install the following required packages for Redis Setup:
sudo apt install software-properties-common apt-transport-https curl ca-certificates -yNow you can use the following curl command to add the Redis GPG key on your server:
curl -fsSL https://packages.redis.io/gpg | sudo gpg --dearmor -o /usr/share/keyrings/redis-archive-keyring.gpgNext, add the Redis official repository on Debian 12:
echo "deb [signed-by=/usr/share/keyrings/redis-archive-keyring.gpg] https://packages.redis.io/deb $(lsb_release -cs) main" | sudo tee /etc/apt/sources.list.d/redis.listFinally, run the system update and use the command below to install Redis packages on your server:
# sudo apt update
# sudo apt install redis redis-server redis-tools -y
You can verify your Redis installation by checking its version:
redis-server -vOutput
Redis server v=7.2.4 sha=00000000:0 malloc=jemalloc-5.3.0 bits=64 build=44edf16bebe6fed2Step 2. Start and Enable Redis Server on Debian 12
Once your installation is completed, you can use the following command to start and enable the Redis server:
sudo systemctl enable --now redis-serverThen, verify Redis server is active and running on Debian 12:
sudo systemctl status redis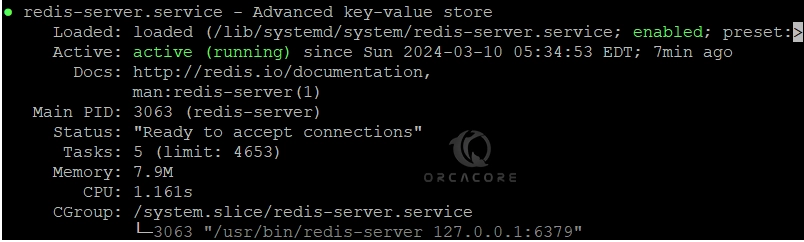
Also, you can test your Redis functionality with the command below:
redis-cli pingIn your output, you should get the PONG word.
Step 3. Redis Server Configuration on Debian 12
At this point, you must edit the Redis config file and limit access to the local host or private IP address on Debian 12. To do this, open the file with your desired text editor like Vi editor or Nano editor:
sudo vi /etc/redis/redis.conf
In the file, look for the bind line. It looks like this:
bind 127.0.0.1 -::1
You can replace it with your server’s IP address or keep it with the local host:
bind your_private_ip or 127.0.0.1Once you are done. Save and close the file.
To apply the changes, restart the Redis server:
sudo systemctl restart redisStep 4. Set up the Redis Server Password
At this point, you can set up a Redis password from the Redis config file on Debian 12. Again open the Redis config file:
sudo vi /etc/redis/redis.confFind the Security section and search for the “requirepass foobared” directive. Uncomment it by removing the # and replacing the foobared phrase with a very strong password:
requirepass strong-passwordWhen you are done, save and close the file.
Then, restart the Redis server to apply the changes:
sudo systemctl restart redisStep 5. Verify Redis Server Password with Redis Client
At this step of Install and Configure Redis on Debian 12, To test that the password that you have set works correctly, open the Redis client with the following command:
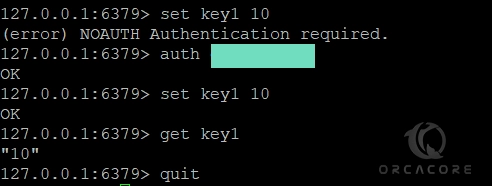
redis-cliThe first command tries to set a key to a value before authentication:
set key1 10At this point, Redis returns an error, because you have not yet authenticated. Use the following command to authenticate with the password you have set in the Redis configuration file:
auth your_redis_passwordAfter entering your Redis password, in your output, you will see OK.
Then run the previous command, it should be working now. In your output, you should see OK. Now use the get key1 command to query Redis for the value of the new key.
Exit from the Redis client with the quit command.
Step 6. Change Dangerous Redis Commands on Debian 12
At this point, you have learned to Install and Configure Redis on Debian 12. For more security, Redis allows you to rename or completely disable certain commands that are considered dangerous. like: FLUSHDB, FLISHALL, KEYS, CONFIG, DEBUG, SHUTDOWN, SAVE, STOP, RENAME, etc.
To enable or disable Redis commands, open the Redis configuration file and go to the Security section:
sudo vi /etc/redis/redis.confNow you can disable or kill a command by renaming it to an empty string like this:
# It is also possible to completely kill a command by renaming it into
# an empty string:
#
rename-command FLUSHDB ""
rename-command FLUSHALL ""
rename-command DEBUG ""
Also, you can rename a command by giving it another name like this:
# It is also possible to completely kill a command by renaming it into
# an empty string:
#
rename-command FLUSHDB ""
rename-command FLUSHALL ""
rename-command DEBUG ""
rename-command SHUTDOWN SHUTDOWN_ORCA
rename-command CONFIG ORCA_CONFIG
Once you are done, save and close the file.
Now you can open the Redis client to test your new commands:
redis-cliThen, authenticate yourself with the password that you have set:
auth your_redis_passwordWe assumed that you rename the config command to orca_config. If you use config you will get an error:
config get requirepassYou should use the renamed command:
orca_config get requirepassIn your output you will see:
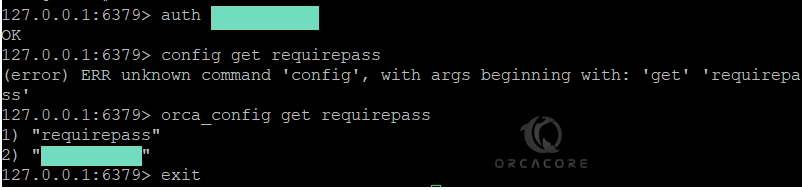
Now you can exit from the Redis client with the exit or quit command.
Warning: at the end of the Security section in the /ect/redis/redis.conf file, there is a warning statement which is:
. . .
# Please note that changing the name of commands that are logged into the
# AOF file or transmitted to slaves may cause problems.
. . .
This means if the renamed command is not in the AOF file, or if it is but the AOF file has not been transmitted to replicas, then there should be no problem. The best time to rename the command is when you’re not using AOF persistence or right after installation.
Note: You can learn more about Redis’s commands and determine how they might be misused at redis.io/commands.
Conclusion
At this point, you have learned to Install and Configure Redis on Debian 12, Change your Redis serve password, test it by using the Redis client, and Rename the dangerous commands. Hope you enjoy using it.
Also, you may like to read the following articles:
Plex Media Server Setup on Debian 12 Command Line
Jenkins Server Installation Tutorial on Debian 12