Share your love
Install XRDP on Rocky Linux 9 | Best Remote Desktop Access
This tutorial on the Orcacore website will teach you How To Install XRDP on Rocky Linux 9. XRDP is a free and open-source implementation of Microsoft RDP (Remote Desktop Protocol) server for operating systems other than Windows, such as Linux. It offers some key advantages:
- It’s open-source
- It makes it simpler to connect to Linux systems
- It’s fairly quick to set up
- It’s not bandwidth intensive
- It’s entirely free
Table of Contents
Steps To Install and Configure XRDP on Rocky Linux 9
To complete this guide, you must log in to your server as a non-root user with sudo privileges and set up a basic firewall. To do this, you can follow our guide on Initial Server Setup with Rocky Linux 9.
1. Install Gnome GUI on Rocky Linux 9
First, you need to update your local package index with the following command:
sudo dnf update -yGnome is the default desktop environment on Rocky Linux 9. To install it, use the following command:
sudo dnf groupinstall "Server with GUI" -yYour installation may take some time to complete.
2. Install XRDP on Rocky Linux 9
Xrdp is available in the EPEL repository. You need to install the EPEL repo on your server with the following command:
sudo dnf install epel-release -yNow you can install Xrdp on Rocky Linux 9 with the following command:
sudo dnf install xrdp -yStart and Enable XRDP
When your installation is finished, you need to start and enable the service with the following command:
sudo systemctl enable xrdp --nowVerify that Xrdp is active and running on Rocky Linux 9 with the following command:
sudo systemctl status xrdpIn your output you will see:
Output
● xrdp.service - xrdp daemon
     Loaded: loaded (/usr/lib/systemd/system/xrdp.service; enabled; vendor pres>
     Active: active (running) since Mon 2022-11-26 05:09:16 EDT; 6s ago
       Docs: man:xrdp(8)
             man:xrdp.ini(5)
   Main PID: 13167 (xrdp)
      Tasks: 1 (limit: 23609)
     Memory: 1.1M
        CPU: 7ms
     CGroup: /system.slice/xrdp.service
             └─13167 /usr/sbin/xrdp --nodaemon
...
Now that you have Xrdp active and running on your server, let’s configure Xrdp on Rocky Linux 9.
3. Configure XRDP on Rocky Linux 9
For basic Xrdp connections, you do not need to make any changes to the configuration files. Xrdp uses the default X Window desktop, which in this case, is Gnome.
The configuration files are located in the /etc/xrdp directory. And the main configuration file is the xrdp.ini. It allows you to set global configuration settings like security and listening addresses and create different xrdp login sessions.
Just remember every time you make any changes, you need to restart the Xrdp to apply the changes:
sudo systemctl restart xrdpAlso, Xrdp uses the startwm.sh file to launch the X session. If you want to use another X Window desktop, edit this file.
Configure Firewall For XRDP
Here you need to add a rule to allow traffic on the Xrdp port. By default, Xrdp listens on port 3389.
Typically you would want to allow access to the Xrdp server only from a specific IP address or IP range. To do this, run the following commands:
sudo firewall-cmd --new-zone=xrdp --permanentsudo firewall-cmd --zone=xrdp --add-port=3389/tcp --permanentsudo firewall-cmd --zone=xrdp --add-source=192.168.1.0/24 --permanentTo allow traffic to port 3389 from anywhere you can use the following command instead:
sudo firewall-cmd --add-port=3389/tcp --permanentAfter this, you need to reload the firewall to apply these changes:
sudo firewall-cmd --reloadTo boot into Graphical mode, we will reboot the system with the below command,
rebootNow that the Xrdp server is configured, it is time to open your local Xrdp client and connect to the remote Rocky Linux 9 system.
4. XRDP Remote Desktop Connection From Windows
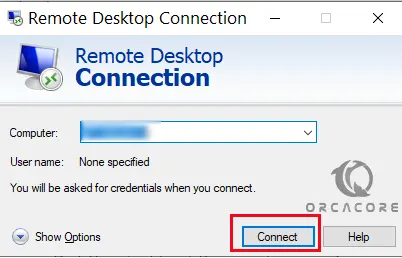
To access the remote Rocky Linux 9, open the run window with Winky+R and type the “mstsc” in it. This will open the RDP client. Type your IP address and click connect:
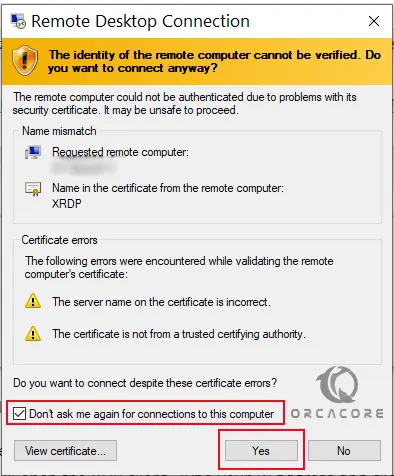
This will display a warning that the identity of the remote computer cannot be verified. Click the don’t ask me again and press yes to continue:
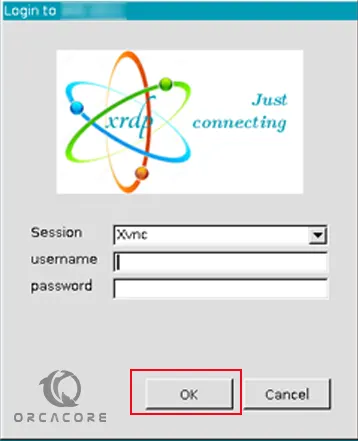
Now on the login screen enter your server’s username and password:
Once logged in, you should see the default Rocky Linux 9 Gnome desktop. It should look something like this:

You can now start interacting with the remote desktop from your local machine using your keyboard and mouse.
Note: If you are using macOS, you can install the Microsoft Remote Desktop application from the Mac App Store. Linux users can use an RDP client such as Remmina or Vinagre.
Conclusion
At this point, you have learned to install XRDP on Rocky Linux 9. XRDP on Rocky Linux 9 is used to enable remote desktop access to the system, allowing users to connect to the Linux desktop environment from Windows or other RDP-compatible clients.
Hope you enjoy it. Please subscribe to us on Facebook, Instagram, and YouTube.
You may also like these articles:
Install and Configure XRDP on Ubuntu 22.04