Share your love
How To Secure Apache with Let’s Encrypt on Debian 10

In this article from the Orcacore website, we want to teach you How To Secure Apache with Let’s Encrypt on Debian 10. Let’s Encrypt is a Certificate Authority (CA) that lets you get and install free TLS/SSL certificates by enabling encrypted HTTPS on web servers. Now proceed to the following steps to learn How To Secure Apache with Let’s Encrypt on Debian 10.
Table of Contents
Learn To Secure Apache with Let’s Encrypt on Debian 10
Before you start to get your TLS/SSL certificates, you need to meet some requirements first. Let’s see what we need.
You need to log in to your server as a non-root user with sudo privileges and set up a basic firewall. To do this, you can check the Initial Server Setup article for Debian 10.
You need a valid domain name that is pointed to your server’s IP address.
Also, you need to install Apache and set up its virtual hosts. In this article about How to install LAMP Stack on Debian 10, we completely explain it you can check it and then continue this guide.
Step 1. How To Install Certbot on Debian 10?
Here you need to install the certbot software on your Debian 10 server to get an SSL certificate from Let’s Encrypt.
Note: Certbot is not available in the Debian default repositories. because of this, we use Snappy which is a package manager developed for Linux systems that install packages in a format referred to as snaps.
At this point, to install certbot as a snap on Debian 10, you need to install snapd on your server first.
Update the APT packages with the following command:
sudo apt updateThen, install snapd with the following command:
sudo apt install snapd -yHere, you need to install some dependencies on your server that are needed for any snap you install with the following command:
sudo snap install coreRefresh the core with the following command:
sudo snap refresh coreNow you can install certbot snap on Debian 10 with the following command:
sudo snap install --classic certbotThis will install the certbot executable in the /snap/bin/ directory.
Here, you need to create a symbolic link to this file in the /usr/bin/ directory to be sure that you can run the certbot command anywhere on your system. Run the following command:
sudo ln -s /snap/bin/certbot /usr/bin/certbotCertbot is now ready to use to get your SSL certificate for Apache.
But before this, you need to verify that Apache has been configured correctly.
Step 2. Configure Apache and Adjust Firewall Settings
Certbot needs to be able to find the correct virtual host in your Apache configuration for it to automatically configure the SSL certificate.
At this point, you can check the virtual host file for your domain with the following command: Here we use the vi text editor; you can choose your favorite text editor.
Also, remember to replace the domain name with your own.
sudo vi /etc/apache2/sites-available/apache.orcacore.net.confFind the ServerName line. It should look like this with your domain name:
...
ServerName apache.orcacore.net
...
If it doesn’t fill with your domain name, update it and put your domain name instead of it. When you are finished, save and close the file.
Now check for no syntax errors with the following command:
sudo apache2ctl configtestOutput
. . .
Syntax OKIf you get an error, open the file again and check for any typos or missing characters.
Now you need to reload Apache for the new configuration changes with the following command:
sudo systemctl reload apache2Now you need to update the firewall to allow HTTPS traffic. We assumed that you enabled the UFW firewall from the requirements. See the current settings with the following command:
sudo ufw statusIf you followed the installation of Apache from the requirements, your output should be similar to this:
Output
Status: active
To Action From
-- ------ ----
WWW Full ALLOW Anywhere
...
WWW Full (v6) ALLOW Anywhere (v6)
...Note: If you see just the WWW profile, you should enable the “WWW full” profile with the following command;
sudo ufw allow 'WWW Full'Then, delete the WWW profile allowance with the following command:
sudo ufw delete allow 'WWW'Now you can run certbot and fetch your certificates.
Step 3. Get an SSL Certificate: Secure Apache with Let’s Encrypt
You can use certbot to get an SSL certificate through plugins. To use the Apache plugin, run the following command:
sudo certbot --apache -d apache.orcacore.net -d www.apache.orcacore.netFor a single domain, run the following command instead:
sudo certbot --apache -d apache.orcacore.netYou will be asked to enter your email address. Then, agree to the terms of service.
Also, you will be asked to share your email address with the Electronic Frontier Foundation. It depends on whether you press N or Y to continue.
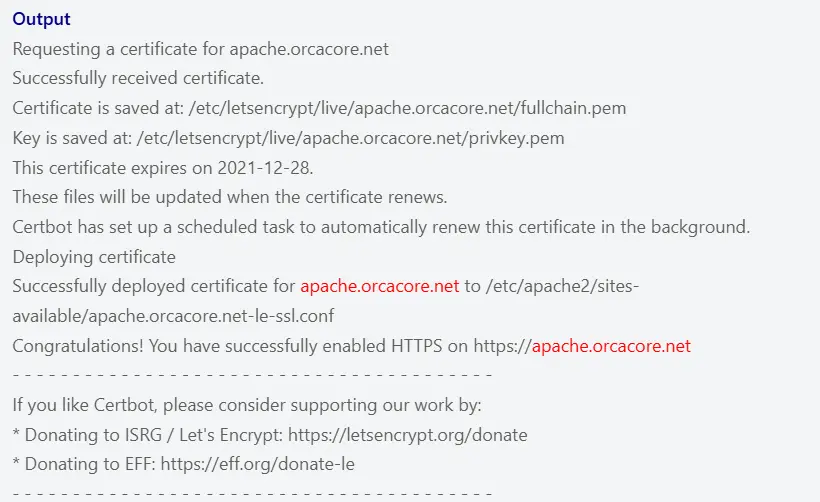
Your output should be similar to this:

At this point, your certificates are downloaded, installed, and loaded.
Now you can reload your website:
https://apache.orcacore.netYou will see the lock icon in your web browser.
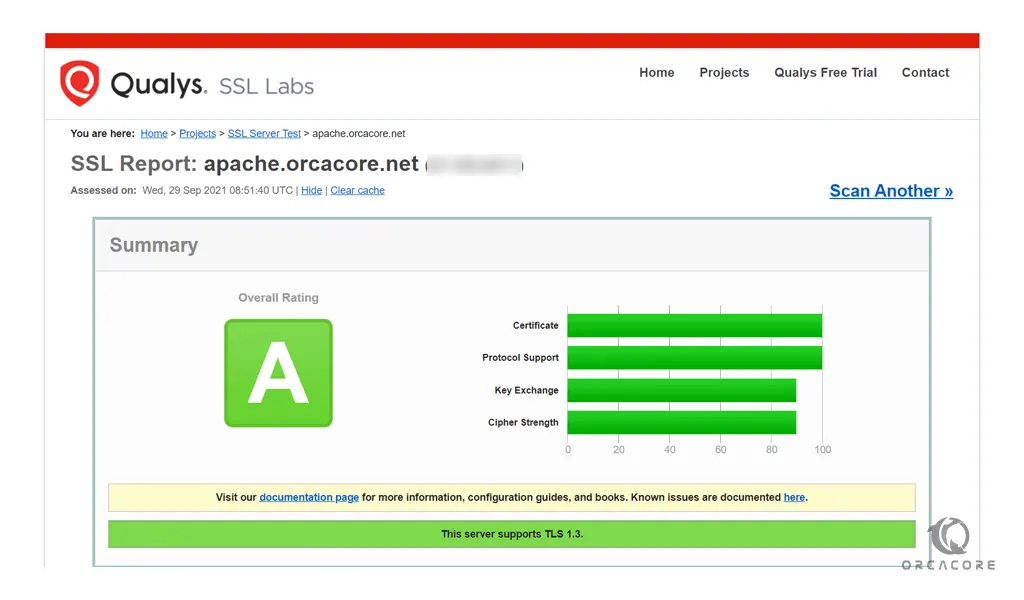
Also, you can test your server with SSL Labs Server Test, which will give you an A grade.

Let’s finish by testing the renewal process.
How to Set up Certbot Auto-renewal?
At this point, you have learned to secure Apache with Let’s Encrypt on Debian 10. But you should know that the Let’s Encrypt SSL certificate is only valid for 90 days.
The certbot package takes care of this for us by adding a renew script to /etc/cron.d. This will run twice a day and will automatically renew any certificate that’s within thirty days of expiration.
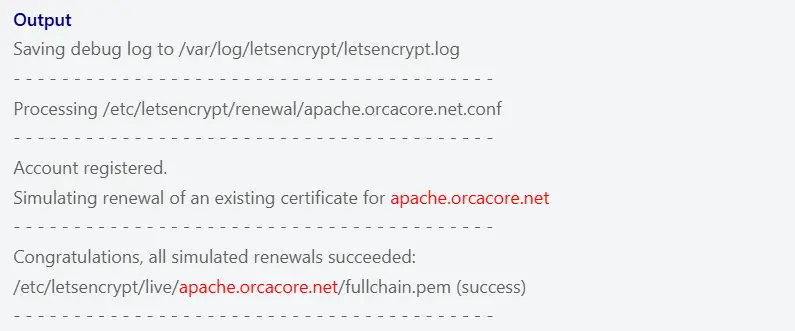
To test the renewal process, run the following command:
sudo certbot renew --dry-runIn your output, you will see:

That’s what you’re done. You have successfully secured Apache with Let’s Encrypt on Debian 10.
Conclusion
At this point, you learn to install the Let’s Encrypt client certbot. Also, you learn to download SSL certificates for your domain and set up the certbot Auto-renewal process.
Hope you enjoy this article about how to secure Apache with Let’s Encrypt on Debian 10. Also, you may like to read the following articles:


