Share your love
aaPanel Setup on AlmaLinux 9 – Free Hosting Control Panel

This guide intends to teach you to aaPanel Setup on AlmaLinux 9 and Access the control panel dashboard via the web browser. aaPanel is a free and open-source web-based control panel used for managing servers including web servers, databases, FTP, email services, etc. Also, it has a user-friendly interface that makes it easy for users to manage their servers from a graphical interface. aaPanel is compatible with popular web servers like Apache, Nginx, and Lighttpd. Also, it supports MariaDB and MySQL as database management engines.
Table of Contents
Easy Steps for aaPanel Setup on AlmaLinux 9
Before you start your aaPanel Setup on AlmaLinux 9, have a clean server without Apache, Nginx, PHP, and MySQL installed. Then, log in to your server as a non-root user with sudo privileges and set up a basic firewall. To do this, you can check the AlmaLinux 9 initial setup guide.
Step 1 – Download aaPanel Installer Script on AlmaLinux 9
The aaPanel provides an installer script that you can use to install the control panel. First, run the system update with the command below:
sudo dnf update -yThen, use the following wget command to download the latest installer from the official website:
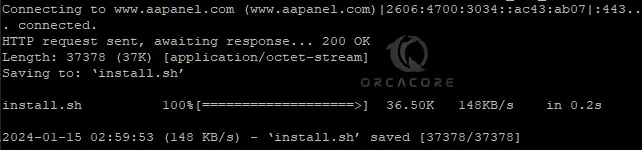
sudo wget -O install.sh http://www.aapanel.com/script/install_6.0_en.shOnce your download is completed, you will see:
Step 2 – Run and Install aaPanel Script on AlmaLinux 9
At this point, you can easily run your aaPanel installer script and start your installation process. To do this, run the command below:
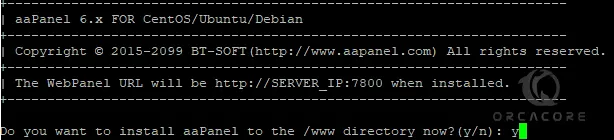
sudo bash install.shIt will ask you to install aaPanel under the /www directory and enter y to continue. Also, it enables SSL. This will install all dependencies and required packages.
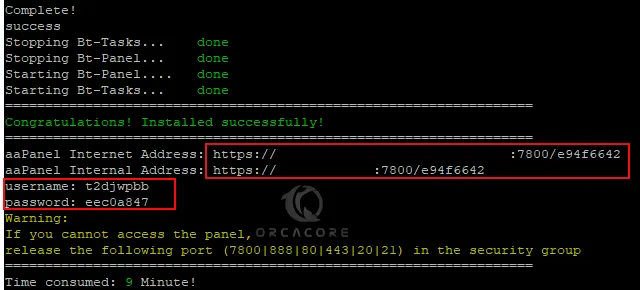
This will take some time to complete. Once your aaPanel Setup on AlmaLinux 9 is completed, you will see:
Step 3 – Configure Firewall Rules For aaPanel Setup
At this point, you can check your aaPanel listening port with the following command:
sudo netstat -nltpExample Output
tcp6 0 0 :::7800 :::* LISTEN Then, you must allow aaPanel listening port through your AlmaLinux 9 firewall rules. To do this, you can run:
sudo firewall-cmd --add-port=7800/tcp --permanent Reload the firewall to apply the new rules:
sudo firewall-cmd --reloadStep 4 – Access aaPanel Hosting Control Panel via Web Interface
It is recommended to use Chrome, Firefox, and Edge browsers to access the panel login address. Now you can use the URL that you have given from the installation step to access your dashboard:
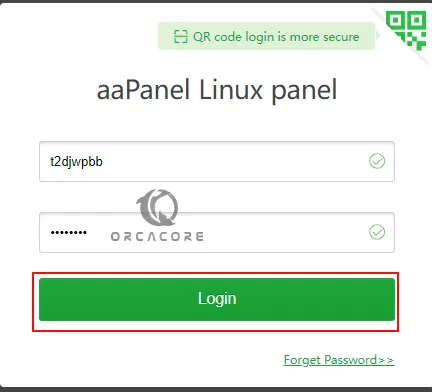
https://server-ip:7800/e94f6642You will see the aaPanel login screen. Enter the username and password that you have got from the installation and click Login.
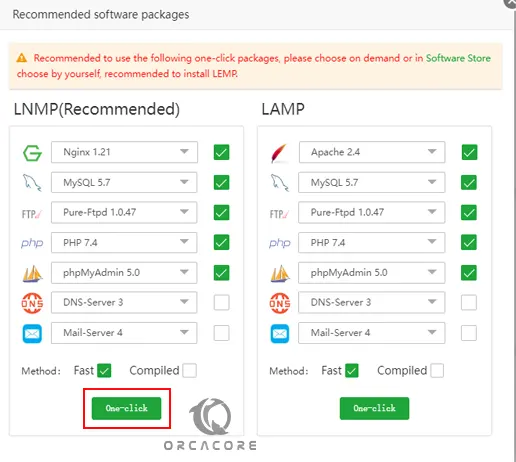
Then, it will recommend you use one-click packages. Select the recommended one and press one-click.
This will take some time to complete. Once it is done, you will see your aaPanel dashboard on AlmaLinux 9.
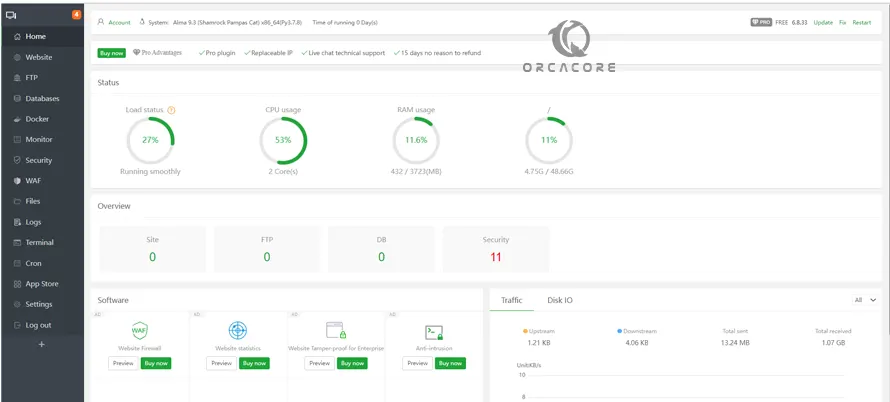
From there, you can add your domain and create a website, add an FTP server, connect to a database and manage it, access the terminal, etc.
Step 5 – Change aaPanel Login Password
For more security, you can change the default aaPanel password. To do this, you can navigate to your panel directory:
cd /www/server/panelThen, use the command below to change your password:
sudo python tools.py panel your-passwordNow you can access your dashboard with the new password you have set.
Step 6 – Manage aaPanel From CLI on AlmaLinux 9
At this point, you can manage your control panel from the command line terminal. The service name of aaPanel is named bt. To stop aaPanel, you can run:
sudo service bt stopThen, you can start your aaPanel service by using:
sudo service bt startAlso, you can restart it with:
sudo service bt restartStep 7 – Uninstall aaPanel From AlmaLinux 9
If you plan to remove aaPanel from your server, you can easily use the following commands. First, stop the service:
sudo service bt stopThen, run the commands below to completely remove aaPanel:
# sudo chkconfig --del bt
# sudo rm -f /etc/init.d/bt
# sudo rm -rf /www/server/panel
Final Words For aaPanel Setup
The aaPanel setup on AlmaLinux 9 can be a simple and efficient way to manage your servers. aaPanel is a good option for those who are looking for a user-friendly interface and easy-to-use panel for server management. Also, both new and advanced administrators can use aaPanel and get the benefits from it.
Hope you enjoy using it. Also, you may like to read the following articles:
Extract a tar.gz file in Linux