Share your love
Enable HyperV on Windows Server 2025 | Comprehensive Setup

In this guide, you will learn to Enable HyperV on Windows Server 2025 and Create a Virtual Machine in Hyper-V Manager. Hyper-V is Microsoft’s native hypervisor included in Windows Server 2025, designed to create and manage virtual machines (VMs) on x86-64 systems. Its primary purpose is to enable virtualization, allowing multiple operating systems to run concurrently on a single physical server.
You can now proceed to the guide steps below on the Orcacore website to Install Hyper-V on Windows Server 2025 and Create a Test Virtual Machine in it.
Table of Contents
Install and Configure Hyper-V on Windows Server 2025
To complete the Hyper-V setup on Windows Server 2025, log in to your Windows Server and follow the steps below.
Note: Also, you can check for the Video Tutorial of Hyper-V Setup on Windows Server 2025:
1. Enable HyperV on Windows Server 2025
To enable HyperV on Windows Server 2025, you must open the Server Manager and click on Add Roles and Features.

In the Installation Type section, click on Role-based or feature-based installation and click Next.

Then, you must select the Destination Server. Here we Select a server from the server pool and click Next.

In the Server Roles section, find the Hyper-V option and click on it. This will open a window where you must add Hyper-V features.

Then, you will see that the Hyper-V option has been selected. Click Next to continue.

In the Features section, you can add more features to the selected server. You can keep the default option and click Next.

Next, read the Hyper-V information and click Next.

Then, you can create Virtual Switches. You can select a network adapter for remote access or you can keep it by default and click Next.

In the Virtual Machine Migration, you can click Next to keep the default settings or adjust your configuration and click Next.

Now you can set locations for storing Virtual Hard Disk files and VM config files. You can keep the default settings and click Next.

Finally, verify your Hyper-V settings on Windows Server 2025 and click Install.

Wait until your installation is completed, then, you must restart your system.

2. Create a Virtual Machine with Hyper-V Manager
At this point, from your server manager, click on Tools and open Hyper-V Manager on Windows Server 2025 to add a new virtual machine.

Then, select your server, from the right-side panel, click on New, and select Virtual Machine.

Read the Before Begin information and click Next.

Now you need to choose a name for your Virtual Machine and if you want to store it in another location, be sure you have enough space. Click Next to continue.

At this point, you need to choose the Generation of your virtual machine. Here we choose Generation 2 which requires a supported 64-bit operating system. Click Next to continue.

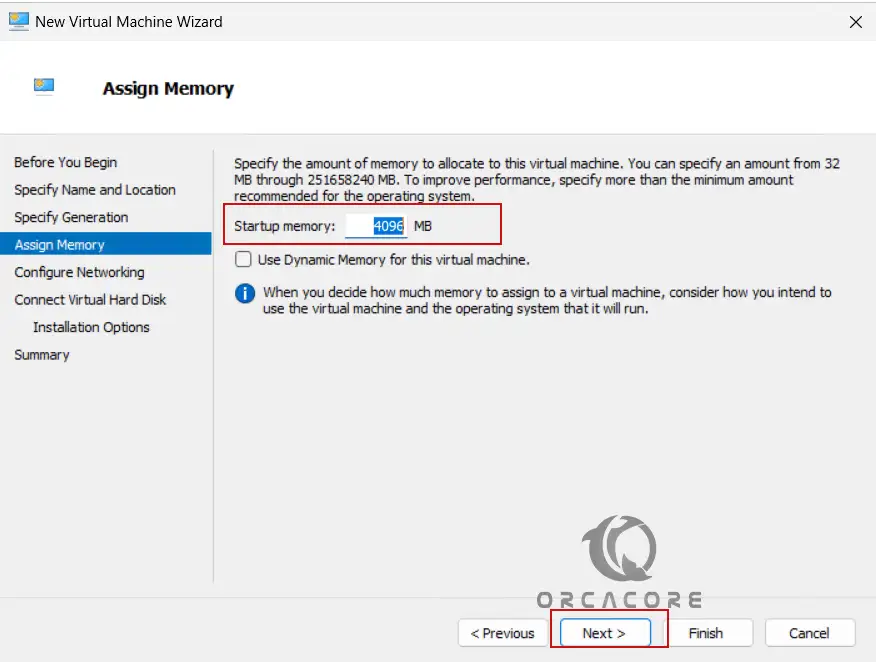
Then, you must specify the memory to allocate to your virtual machine. Then, click Next.
Because we don’t configure a virtual switch for the virtual machine’s network connection, it remains disconnected. Click Next to continue.

Now you must create a virtual hard disk, select a location, and specify the size for it. Then, click Next to continue.

At this point, you can select your Installation option. You can use a bootable CD/DVD, ISO File, or Floppy disk. Or you can install your operating system later. Click Next to continue.

Complete your Virtual Machine setup by clicking on Finish.

Now you must see that your VM has been created. Because we choose to install the operating system later, here we want to show you how to add the OS with an ISO file.
3. Add an ISO File to an Existing Virtual Machine in Hyper-V
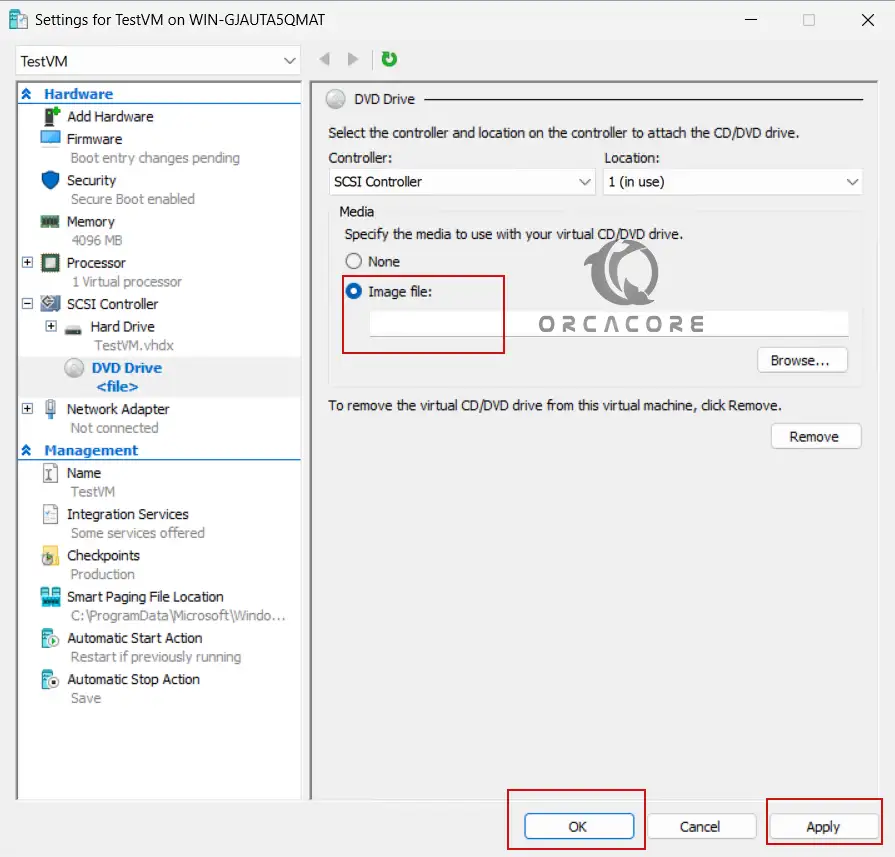
To add the ISO file, you must click on your virtual machine settings.

In the left panel, expand IDE Controller 1 or SCSI Controller (depending on the VM generation). Select DVD Drive and click Add.

From there, you can add your ISO File for your OS installation. Then, click on Apply and OK.
Finally, you can easily manage your Virtual Machine in Hyper-V on Windows Server 2025.

That’s it, you are done with the Hyper-V setup on Windows Server 2025.
Conclusion
Installing Hyper-V on Windows Server 2025 is a straightforward process using Server Manager. Once installed, you can create and manage virtual machines efficiently. Hope you enjoy it.
Please subscribe to us on Facebook, YouTube, and X.
You may also like to read the following articles:
Create a Virtual Machine with VirtualBox in Windows
Create a virtual machine in VMware Workstation 17 pro
Install Visual Studio on Windows Server 2025
Install Wireshark on Windows Server 2025
FAQs
What are the system requirements for Hyper-V Windows Server 2025?
1. A 64-bit processor with SLAT (Second Level Address Translation) support.
2. Minimum 4GB RAM (more is recommended for multiple VMs).
3. Windows Server 2025 Standard or Datacenter Edition.
How do I check if my system supports Hyper-V?
You can use the command below from PowerShell:systeminfo | findstr "Hyper-V"If Hyper-V requirements are enabled, your system can support Hyper-V.
What’s the difference between Generation 1 and Generation 2 VMs?
Gen 1: Supports older OS versions, and BIOS boot.
Gen 2: Supports modern OS, UEFI boot, Secure Boot, and better performance.