Share your love
Work with Windows 11 Terminal
In this guide, you will learn to Work with Windows Terminal on Windows 11. The Windows 11 Terminal is a command-line interface app that provides users with an integrated platform to access different command-line tools, shells, and environments. It supports Command Prompt, PowerShell, and Windows Subsystem for Linux (WSL). Windows Terminal allows users to open multiple tabs, customize profiles for different shells, and have more interaction with the system through text-based commands.
Step-by-Step Guide To Work with Windows 11 Terminal
At this point, you can log in to your Windows Client and follow the steps below to start working with Windows 11 terminal.
Step 1 – Run Windows 11 Terminal
To run the Windows terminal, you can simply type terminal in your search bar, right-click on it, and select Run as administrator.
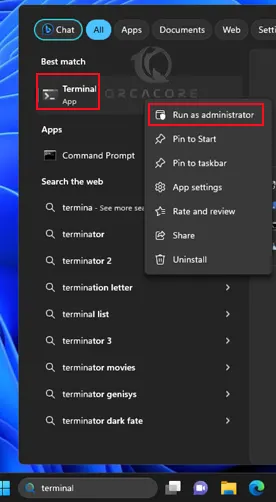
As you can see, Windows Terminal opens with a PowerShell prompt. From there, you can easily use the PowerShell commands to do your tasks.

Step 2 – Switch Between Shells in Windows 11 Terminal
At this point, you can easily change the default PowerShell prompt to the command prompt or others. To do this, you can click the down arrow next to the + button.
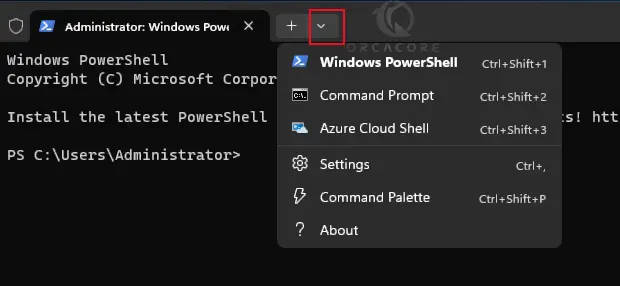
As you can see, you can simply click on Command prompt or Azure Cloud Shell. For example, we click on Command Prompt. This will open a new tab with a command prompt shell.

From there, you can easily run your CMD commands. To get more information about CMD commands, you can check the Essential CMD commands for Windows.
Step 3 – Customize the Terminal
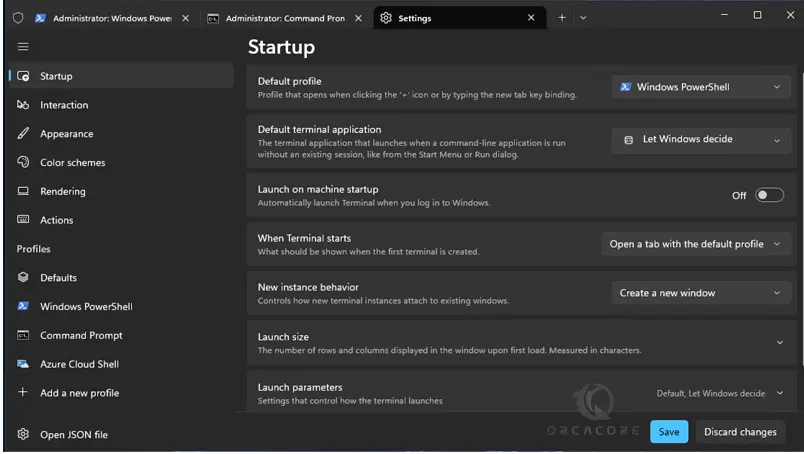
At this point, you can customize your terminal by clicking on the down arrow and selecting Settings.

From the setting tab, you can make the changes you want, and then click Save to save them. For example, you can change the default profile, terminal app, etc.
Also, you can change or define new actions from the Actions tab to easily access the settings you want.
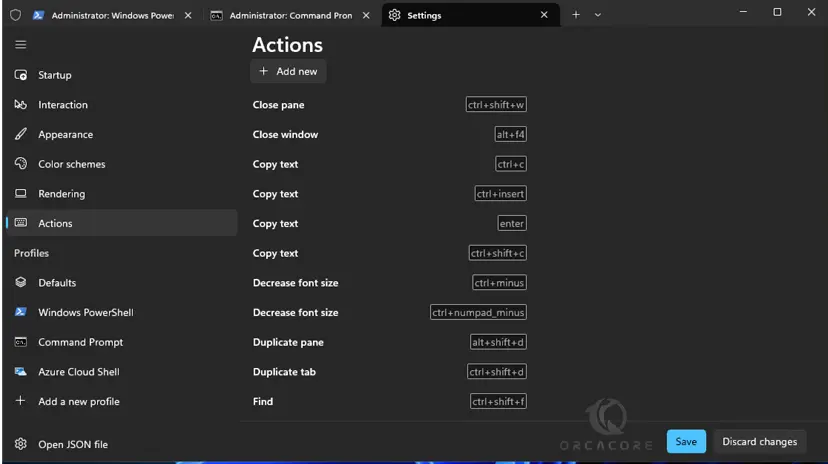
As you can see, you can simply change the appearance and colors of your terminal and select Interaction to determine the formats for copying and pasting.
Final Words – Best Practices For Windows Terminal
At this point, you can discover some key features and best practices for using Windows 11 Terminal:
- Use Multiple Tabs: This allows you to control and switch between different command-line shells.
- Customize Profiles: You can set unique colors, fonts, and starting directories for different profiles.
- Explore Different Shells: Windows 11 Terminal supports different shells, including Command Prompt, PowerShell, and Linux-based shells through Windows Subsystem for Linux (WSL).
- Shortcut Keys: Learn and use shortcut keys to navigate through tabs and panes quickly.
- Integration with WSL: This allows you to work with both Windows and Linux commands in the same Terminal instance.
- Install Additional Shells: Windows Terminal allows you to install additional shells.
- Search Functionality: Also, you can use the search functionality within the Terminal to quickly find and rerun commands from your command history.
- Stay Updated: Keep your Windows Terminal app up to date to get the latest features, bug fixes, and improvements.
- Custom Key Bindings: Customize key shortcuts to match your needs.
- Backup Settings: This ensures you can easily restore your preferred setup in case of a system reset or when using Terminal on a different machine.
That’s it, you are done. As you can see, the Windows terminal allows you to do your tasks more efficiently and switch between shells quickly. Hope you enjoy it.
Also, you may like to read the following articles:
Turn Off Web Results in Windows 11 Start Menu
SMTP Setup on Windows Server 2022
Run Internet Speed Test in Windows PowerShell

